by Victoria Berasaluce Guerra (LTL Contributor)
If you are reading this article, you might feel intrigued by using digital escape rooms in your World Language classroom. Whether this is your first try at digital escape rooms or a returning fan, here I share some ideas and steps that might be helpful
Starting with…why even do a digital escape room (DER)?
Digital escape rooms are basically an activity online where there is an imaginary room you and/or your group must escape from by solving several clues that will finally release you from the room. Physical escape rooms also exist, and you can try them in your class or with friends at a special venue. It’s fun!
So what are the benefits of DER?
For starters, their versatility for any unit of your curriculum. They help boost collaborative work and engage students through problem solving and critical thinking. They are also easy to tailor to your classroom’s needs and a novel way to incorporate culture. Last but not least, they prove engaging for educators looking to be creative with their assignments.
When to use DERs
You could create a DER for the end of your unit to review the contents seen in class, or you could incorporate them as an introductory activity (keeping in mind that students should be able to tap into their background knowledge in the target language).
As a plus, digital escape rooms engage students in all core language skills: reading from the clues, listening to audio resources and instructions, writing to solve the clues and speaking between peers and with their teacher, using the target language.
A teacher can also differentiate through escape rooms by incorporating:
- different modalities of resources: text, auditory and visual
- different roles of the players to exploit their talents
- design an escape room where different paths lead to the same goal
Next is…brainstorming DERs
The sky’s the limit when designing a digital escape room. You could base them on any unit you taught, in any language, for every level of language.
Before starting the building process, teachers need to consider the backwards design planning. This stage can be exhilarating and creative, but you need to be crystal clear on what your objectives are before starting to plan the storyline.
Some questions to ask yourself:
- What are my objectives? Your escape room might be based on a unit or a reading you did in class.
- What skills do you want your students to have mastered or practiced after the activity?
- Storyline? What narrative are you thinking of?
- What rules will I establish for my escape room? Will I give limited attempts to help each group? Will I let them use any resource from the class material? Will it be a collaborative or individual activity? F2F or fully virtual?
Okay…now how do I actually start a DER?
To introduce the technical content, I will clarify that even though there are many ways to create DERs, I will focus on the steps to follow when creating them on Google slides. And don’t worry if your school or institution does not use Google.
Step 1: Set the room and the mood
On a blank Google slide, choose your background by clicking on “Background”, then choose an image from your computer or search the web. To add any elements into the room, insert an image. When searching the web, you can add the words “transparent png” to the search to make sure the image does not have a background when you add it onto the slide. You can also add yourself as an emoji from the Bitmoji Chrome Extension in your browser.
Step 2: Create locks
You might create your lock/s in a separate Google form. You can customize the header image, add a title and introduction. Remember to click on the three-dot menu to turn on the option “response validation”. You might add a final message once the lock is “opened”. Another way is to use an external tool to create the actual visual locks, such as Flippity.
Step 3: Construct clues
You can choose if you want to set a path of linear clues or let the students find clues randomly. Finding clues randomly will make the game more complex and test their collaboration and communication skills more. You also must decide if you will add any “distractions”, so elements that don’t really lead to anything. This will also add a level of complexity to the game since students will have to discern what elements serve them for their mission and which ones don’t. You will need to produce links from the elements in the room to the different clues (external sites or Google forms for example).
Step 4: Set a timer and make it competitive!
To set a timer, click on “add video” and search Youtube for a timer specific to the number of minutes you want. Just make sure to watch it first to ensure it is appropriate for school.
Step 5: Share it and have fun!
After testing the DER, copy the URL of the slide and paste it into a blank slide. Change the “/edit” in the URL to “/preview” and hit “Apply”. You will have to allow access so that anyone with the link can view. You can find these settings under the “Share” button on the upper right corner. To make sure your slide gets published and seen, click on “File”, “Share” and “Publish to web”.
Feel free to reach out and share your DERs!
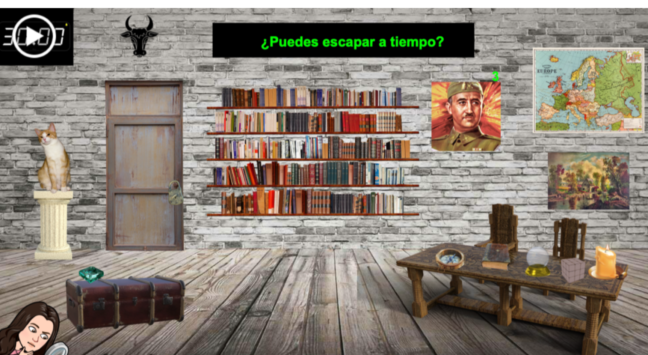
Here is an example of a final DER that I created for a unit based on “Agentes secretos y el mural de Picasso” by Mira Canion:
Give it a try! Click on the picture or check this link. This is an example so that you get an idea. Please, do not get discouraged if you cannot advance much.
Enjoy!
